Mad Moxxi [Borderlands 3]
When Borderlands 3 was announced and they teased us with the Mask of Mayhem sculpt. trailer – I too was one of those crazy people re-watching/freeze framing over the shots of Moxxi and her new outfit. (RIGHT)
I did not have a hard time figuring out when I was going to start on Moxxi. I actually gave myself plenty of time (so I had thought).The only thing to do now was wait for the official ref/in-game ref. to be available.
As friends were already starting other Borderlands 3 characters I was waiting for the official guide. It was the perfect ref. any cosplayer could ever ask for. 360 degree outfit, view. textile ref., pantone color samples, and so much more.
After 2 weeks of searching through fabric stores, stacking my coupons, rummaging through art supplies; I was ready to sit down and start.
Direct link to Gearbox B3 Moxxi Cosplay Ref.: https://cdn.2kgames.com/borderlands/cosplay-guides/BL3_Cosplay_Guide_Moxxi.pdf
1
2

3
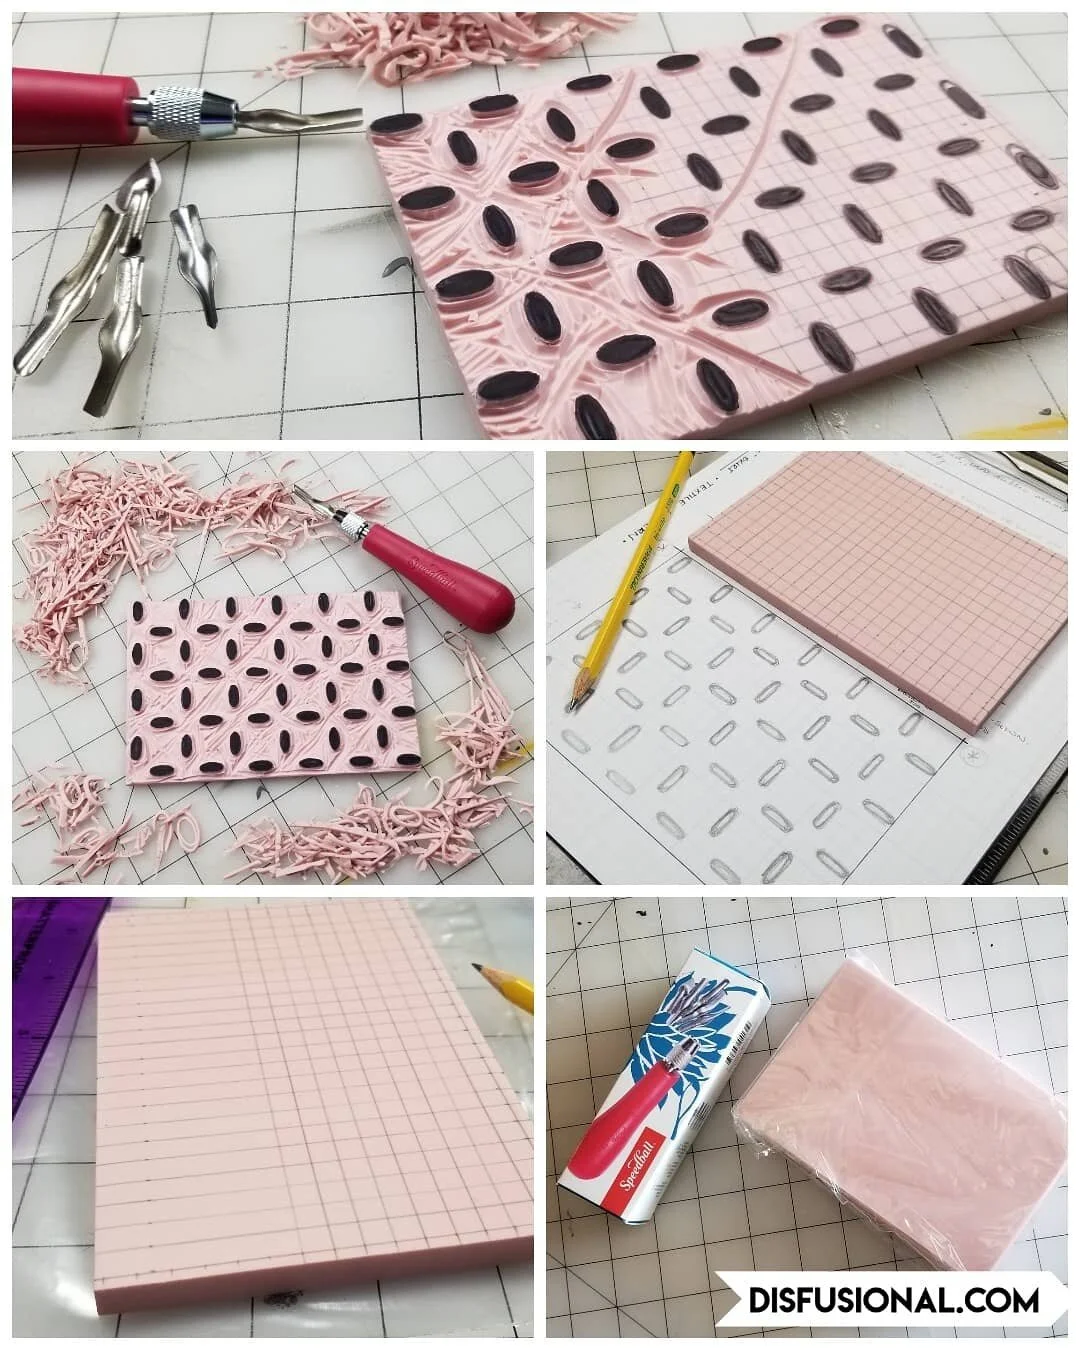
The first task on my Mad Moxxi list was her underskirt. Without the bulk of her underskirt I would not know how to fit her red dress. Moxxi’s skirt has a texture/pattern to it as well as many ruffles or pleats.
[img. 1] I pre-drew out the texture in my desired size, on graph paper. After I was satisfied with the size/positioning – it was time to transfer and start carefully carving. This was a great warm-up for the stamp to come.
[img.2-3] I cut/serged all my skirt pieces prior to stamping out my print on them. I wanted the patter to be seamless. Both the outside and lining of this skirt (including waist band, are stamped with our texture. I added a 1″ horsehair braid to the hem of the skirt. This assisted with the look of her “ruffles”, and also filled out the hem a bit more.
You can see in the finished image [PICTURED BELOW] that the dress sits high at my waist and assists with adding body to my hips.

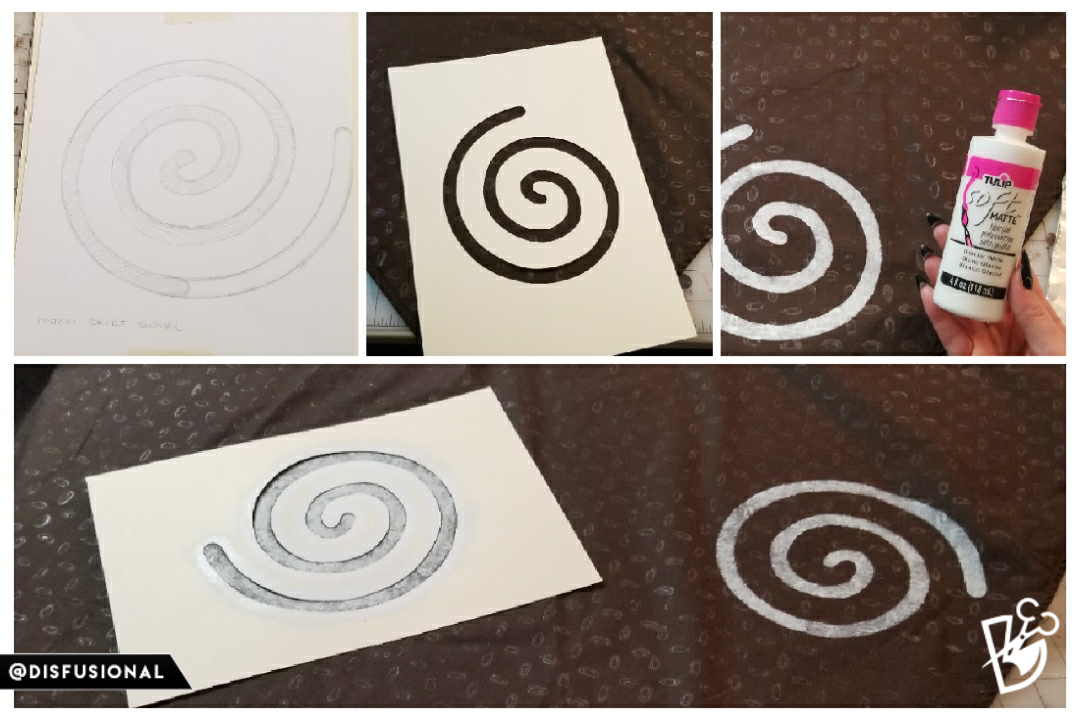
As reluctant as I was to put large white swirls on my skirt… THey turned out better than I could have hoped. I pre-cut out a ‘swirl’ shape on to cardstock. Using White fabric paint and a stippling/dry brush technique; I applied my swirl template to the outside layer of Moxxi’s underskirt. [Img. 4]
4
After month’s of Moxxi construction and playing video games…
When in doubt, make your own curvy underwear.
Again, I printed more brown fabric to pattern out and set matching bum/hip rolls. The idea was to conceal them with the EXACT fabric of the skirt. [Img. 5.1]
[Img 5.2] The overall pads are low enough profile that they will fit under my dress layers. But lump enough that they will not fall flat against all the weight of my belts and bags!

5.1

5.2
I mocked-up Moxxi’s dress prior to cutting my red base fabric. The fabric I selected was 100% cotton and had a small monochromatic, almost grunge, print already on it. This was the perfect background for the official texture, noted in the Borderlands Ref Guide. I scaled the texture drawing to the size I needed. Using carbon paper I traced my black and white template onto a Speedball printing stamp/block.
[img. 5]

It took less than a day to carefully carve away the negative space on the stamp. Leaving only the raised area to be printed onto my fabric panels. I used guide lines to note the direction the panels would be sewn together in. This helped aid the textile/pattern to fit together in a clean repetitive manner.
Besides the outside of the dress, I even stamped the inside lining [img. 7] and all the hat panels too! it was tedious but truly brought the whole piece together. The printing aiding the providing depth to the various layers that make up this form fitting dress.

5

6

7
All the hardware on the dress is actually metal. [img.6-7] The spikes are screw rivets, there are metal grommets, double-cap rivets, wire, snaps, etc. I also used 16-gauge galvanized steel to help sculpt my shape. I like the ‘realistic’ weight that comes along with using real hardwear. This also helped with adding a bit of weight/lifeness to my cosplay pieces. Definitely a personal preference. There is a shine and natural aged-wear they have over time.
To say that I have a love for hats would be an understatement. [img 8, 10, 11] With each hat I create, the goal is to hide ALL my stitches. You can see how I rolled, covered and hid stitches under fabric and along seams. I even managed to stamp my texture on my own double fold bias tape to edge my hat brim and insides with. All rivets on hat are real steel too. There is a bit of weight to this outfit pieces- WORTH IT!!!

8

9

10
As the hat was progressing, I started working on some of the pleather work; as they were starting to overlap in steps. [img. 9] All leather is actually upholstery leather. All of my leather belts and straps are lined with more upholstery leather. They are sewn together for a long lasting/rugged wear. I am rough on my cosplays and like them to be able to handle themselves appropriately! I purchase all my hardware from The Buckle Guy, great quality and hella fast shipping.
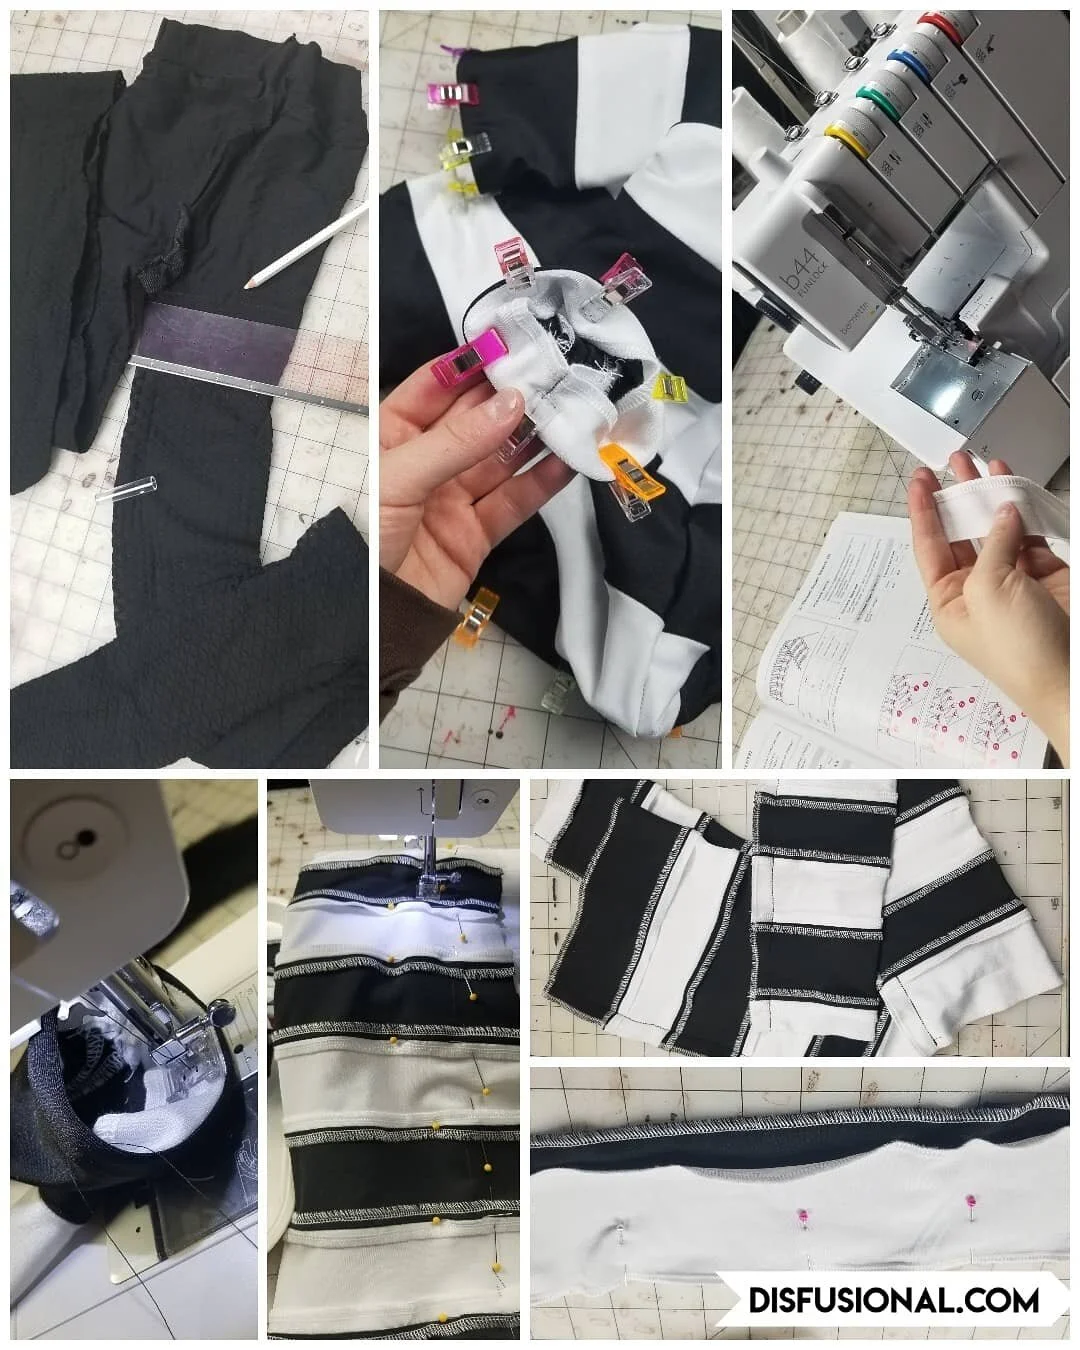
I used stockings for Mad Moxxi’s arm and leg nettings. [img. 12] It was pretty straight forward. I trimmed two legs off of stockings and serged the fresh cuts to stop any unwanted runs. As for Moxxi’s alternating black and white stockings; I used 2-way stretch performance knits. I figured I would serge all my ends in white to help with my seams being less visible. Rolled over my ends and hemmed them for a clean finish.

11
12

13
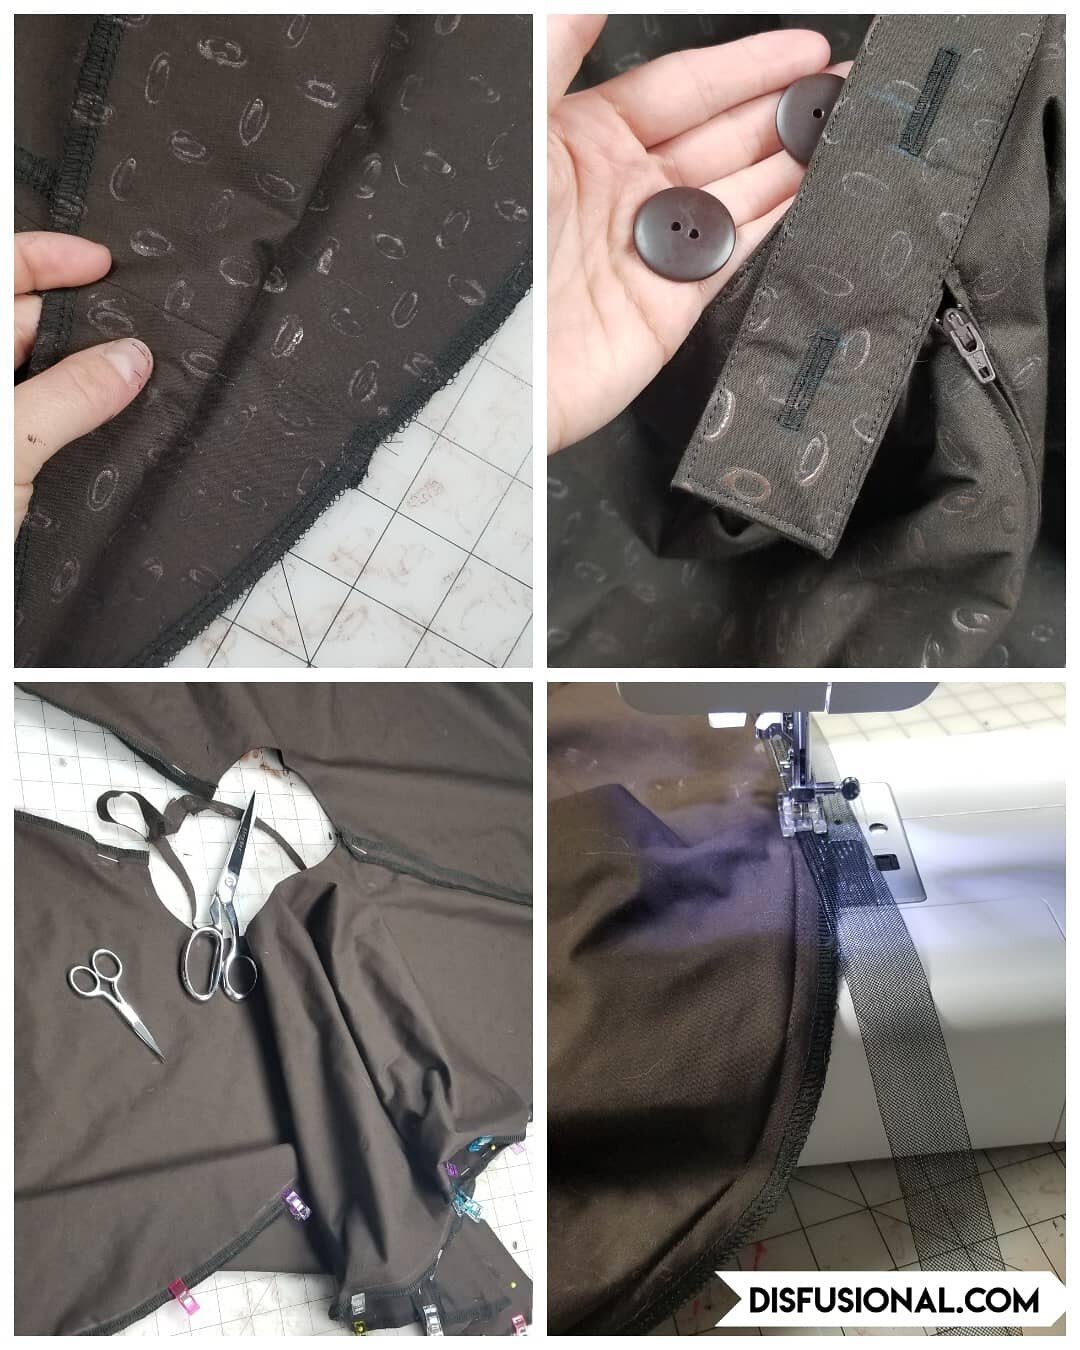
The ‘dress’ had to be edged with mustard-yellow double-fold bias tape. Of course I had to make my own bias tape. This was the moment in my seamstress/fabrication life I took to the internet and finally bought the bias tape makers. Night and Day when making bias tape. I saved so much time! I ended up hand sewing the bias tape the the edge of the dress. It was the only way I could create a completely invisible stitch! My ladder stitch was roughly 1/4 and inch in seperation. This created a very clean edge when sewn together.
I created a corset back for this dress. I even make the dress a corset, courtesy panel. There is a loop at the top for the panel to hook into. No one likes to feel something shifting around, after hours of wear/movement. [img 13] The Red fabric and the Maroon stripes are actually the EXACT same fabric.Both the Teal and the Maroon fabric was hand died to achieve my desired color.
The first time I wore Mad Moxxi; the dress was strapless. I found myself holding my hands up by my chest for most of the day and continuously pulling it up. This was not something I wanted to be a continuous issue. I was reluctant at first but ended up adding bra loops to the inside of my dress top – with a couple clear bra straps it was amazing the level of comfort I felt.

14
15

16
Fun Fact: When I created my tail-pocket-inserts, I embroidered either a ‘R’, ‘L’, or ‘C’ at the top; this ensured an easy packing and assembly. [img 14] I created triangle-like pillow cases that cover my wire/interfacing frames. This also made sure that the 16-gauge galvanized steel does not rub/wear marks on the inside of each of the pockets. The inserts make traveling a breeze. It also helped to be able to take the back ‘flip’ out If I needed to be seated/sit down for an extended period of time!
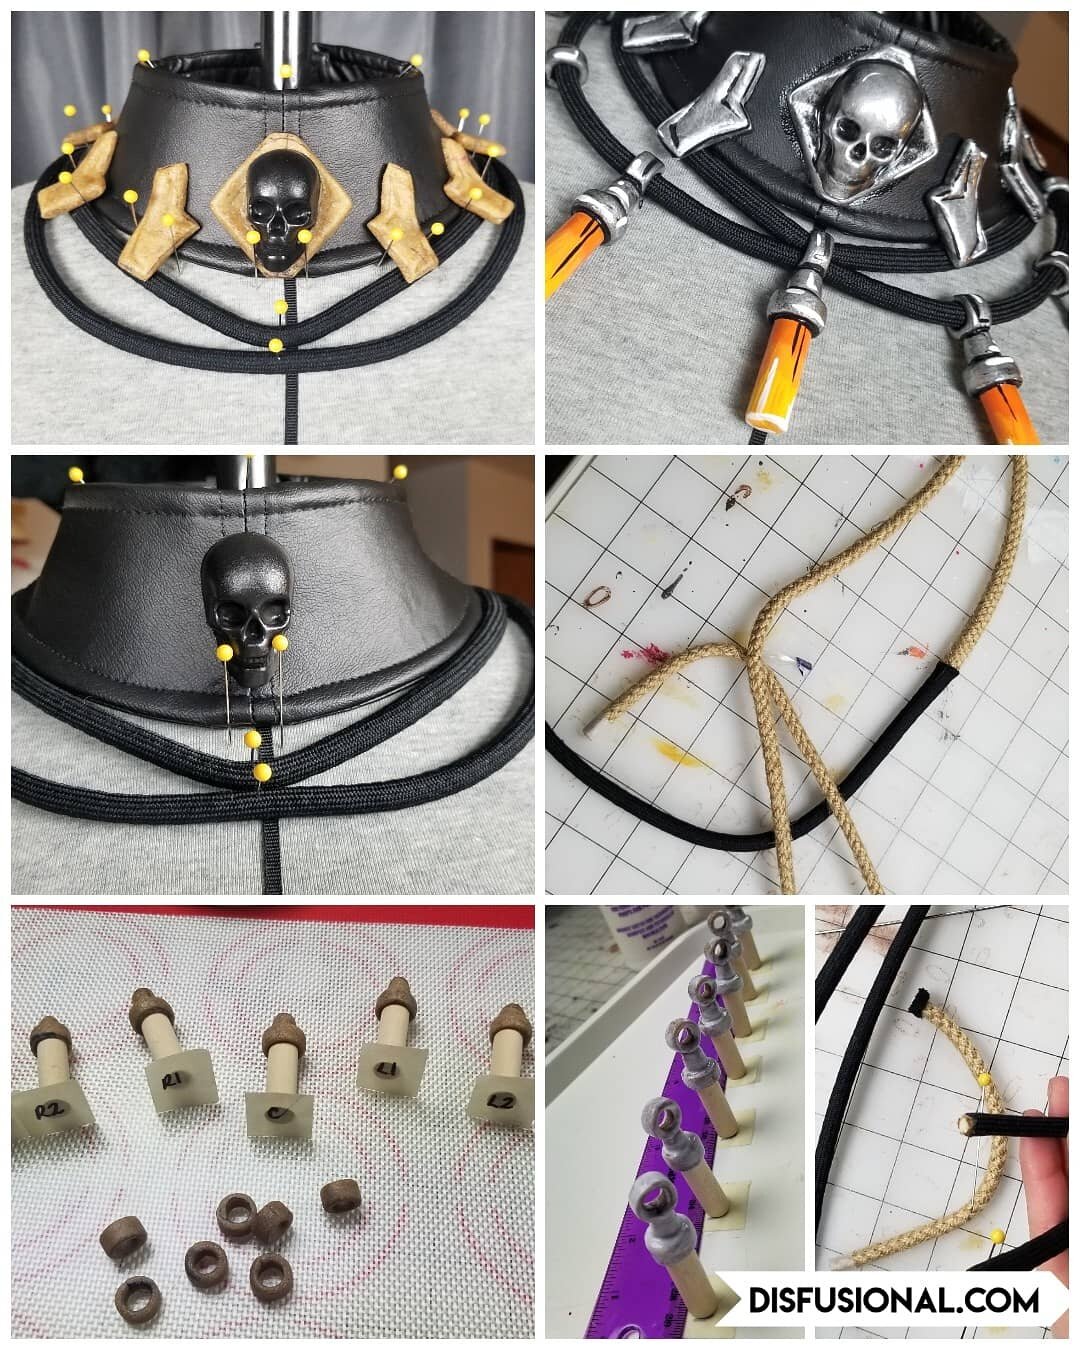
[img. 15] The necklace/collar was probably one of my top 5 pieces from this cosplay. With a snap closure, and upholstery fabric – it turned out to be super comfy. The dangle-pendants are sewn on and move slightly with my movements. I cut up a dowel into pieces and created the eyes with black worbla. By keeping things light, you barely even notice you are wearing it. The hard part was covering my rope/cord with a black cotton sleeve. Had to put a little elbow-grease behind it! All the other necklaces pieces were sculpt from black worbla scraps. Gotta love being able to use every piece of a product – NO WASTE!
We 3D printed all of the bullets. My husband had created a bullet file just for shits and giggles a couple years back. [img.15] Pulling it back up in blender I was able to make it a bit smaller in size for both Moxxi’s belt and hat! Originally I was going to mold and cast them in resin. However, the more we thought about weight distribution – especially on the hat; we realized it was a wiser choice to print them all and endure the pain of sanding the hours away. [img. 16] Worbla was used for the oversized belt-buckle that I could not find in steel ANYWHERE. (I even called my ‘buckle guy’. he laughed) Apparently not many people need a 3″ buckle… imagine that, Nothing some worbla, flexbond, and paint cannot solve.

17

18

19
These earrings were one of the upgrades that was made for C2E2. I grabbed some friendship bracelet string/DMC floss and created my own tassels. By using multiple colors (3 different shades of red), I hope to achieve a gradation that would not need to be painted. [img. 17]
The B3 spats were more complicated than the B2 spats. [img.18-19] Besides my Worbla (teal) D-Rings, there were many layers of lined upholstery fabric. I wanted to try and make it as realistic as possible. Again; all bias tape was handmade/sewn down to continue the esthetics from the dress. All of my white and black upholstery leather spat-pieces are lined with cotton fabrics. However, all my gray Upholstery leather is lines with more gray upholstery leather. I really put my Bernette Chicago 7 through the ringer with this cosplay! We had to sew over wire, through various layers of leather, glue, etc. Real MVP of this cosplay is my sewing machine!

20
[img. 20] I am in love with these feathers. I used more 16-gauge galvanized steel in a 2-ply twist-shape as the feather stem/center. Sandwiched my wire between two pieces of felt with spray adhesive.
I used black and white fabric paint to add my highlights and shadows to my feathers.
I tried to mimic their ingame shape to the best of my abilities. I left the ‘stems’ of the feathers super long w/wire framing. The ‘stems’ act as a hook and hold the feathers under the black hat band.
Both black upholstery leather, hat pieces, are lines with more upholstery leather. The had to be strategically added during the hat construction!
The center hat emblem is sculpted from more worbla scraps. I used Flexbond or Worbla to prime all my pieces with 3 smooth layers. Weathered two playing cards to place within the hat brim.
Moxxi’s wig started out as a: Westley CLASSIC – (CL-074) Spanish Brown + Short Clip CLASSIC – (CL-074) Spanish Brown You can see that the wig has undergone lots of styling and Got2b Glued extreme spiking gel. It definitely took a little bit of product build up to get her front bangs to hang in their desired locations. (Wigs are not my specialty. Unfortunately in the RAGE, that was my wig making, I did not take any progress photos.)

21

22
Time to MASK-UP!!
Excited that I was able to get this SURPRISE part of the project finished up!
After 2020, Conventions are asking cosplayers and con-goers to Mask-Up. Not just as a way to protect yourself, but also others. You mean I only have to put makeup on half of my face… OKAY!! However, nothing is ever ‘simple’ with me.
It was at this moment that I realized my embroidery software was out of date and proceeded to spend an ENTIRE DAY updating to Bernina ArtLink 9 - learning the minute differenced that seemed to F-up my entire day. Face Palm Moment for sure.
However, after hours of struggle and a Red Bull later; I have digitalized a simple one color 4,000 stitch pattern for my Mad Moxxi themed mask. [Img. 21]. After a quick test run for size and stitches… we were off!!
I mimicked Moxxi’s dress design into her mask. Alternating the red brest with the brown breast. I spent an afternoon with my Twitch community designing this up; only to have to vito the Yellow bias tape border around the entire thing -it was a bit too much, even by Moxxi’s standards.
You can view the fully completed mask in my last image. [Img. 22]
**You can View Part of My Moxxi’s Wig Styling, in My Moxxi Makeup [YouTube] Tutorial**
https://www.youtube.com/watch?v=RYxzYeXq5as
BAM! Mad Moxxi is a wrap!
Enjoy some Photos from our First wear of Moxxi back at C2E2 2020… before the word made Otakus out of everyone!

Photographer: Jeff Jenkins Photography (insta/FB/twitter)

Ginoza Costuming – F4LK (LEFT) Disfusional Studios -Mad Moxxi (RIGHT)
Photographer: x_ion_photo (instagram)
We thank you for your continued support. If you are interested in following along with current and future projects – Please, check out any of our social media(s):
Facebook, Instagram, Twitter, Youtube, Twitch
Until next time; I’m Ashlee Kalthoff of Disfusional Studios – don’t forget to ‘Creatively, unfold your imagination’. Bye!